Getting Started
This guide gets you from zero to a bridge-ready setup while the Chrome extension listing is under review.
1) Install Bridge In Your App
- pnpm
- yarn
- npm
- bun
pnpm add @rxova/journey-devtools-bridge
yarn add @rxova/journey-devtools-bridge
npm install @rxova/journey-devtools-bridge
bun add @rxova/journey-devtools-bridge
@rxova/journey-devtools-bridge can be used in Bun-based SPAs. If your browser bundle does not expose a dev/prod env signal, set enabled: true explicitly.
2) Attach Bridge To A Machine
Core Example
import { createJourneyMachine } from "@rxova/journey-core";
import { attachJourneyDevtools } from "@rxova/journey-devtools-bridge";

const journeyMachine = createJourneyMachine(journey);

const detachDevtools = attachJourneyDevtools(journeyMachine, {
  machineId: "checkout-main",
  label: "Checkout Flow",
  appName: "Storefront"
});

journeyMachine.start();

// optional cleanup
// detachDevtools();
The bridge does not auto-start the machine. Call journeyMachine.start() when your app is ready to process navigation and transition commands.
React Example
import { useEffect } from "react";
import { attachJourneyDevtools } from "@rxova/journey-devtools-bridge";
import { checkoutJourney } from "./checkout-journey";

export const JourneyDebugBridge = () => {
  useEffect(() => {
    return attachJourneyDevtools(checkoutJourney.machine, {
      machineId: "onboarding",
      label: "Onboarding Journey"
    });
  }, []);

  return null;
};
3) Extension Availability
The Rxova Journey Devtools Chrome extension is currently pending Chrome Web Store approval.
For now, this public guide does not include local unpacked extension setup.
What you can do now:
- keep bridge integration in place
- verify events and transitions in your app runtime
- prepare unique
machineIdand readablelabelvalues for fast debugging once the extension is available
We will publish the store install link here as soon as approval is complete.
4) Open DevTools Panel (After Approval)
- Install
Rxova Journey Devtoolsfrom the Chrome Web Store. - Open your app page.
- Open Chrome DevTools.
- Select the
Journeypanel.
If bridge messages are flowing, connection state should change to connected.
5) Validate End-To-End (After Approval)
Do this quick check:
- Trigger UI event in app (e.g.
goToNextStep). - Confirm
currentStepIdupdates in Snapshot tab. - Send
goToPreviousStepcommand from panel. - Confirm app returns to previous step.
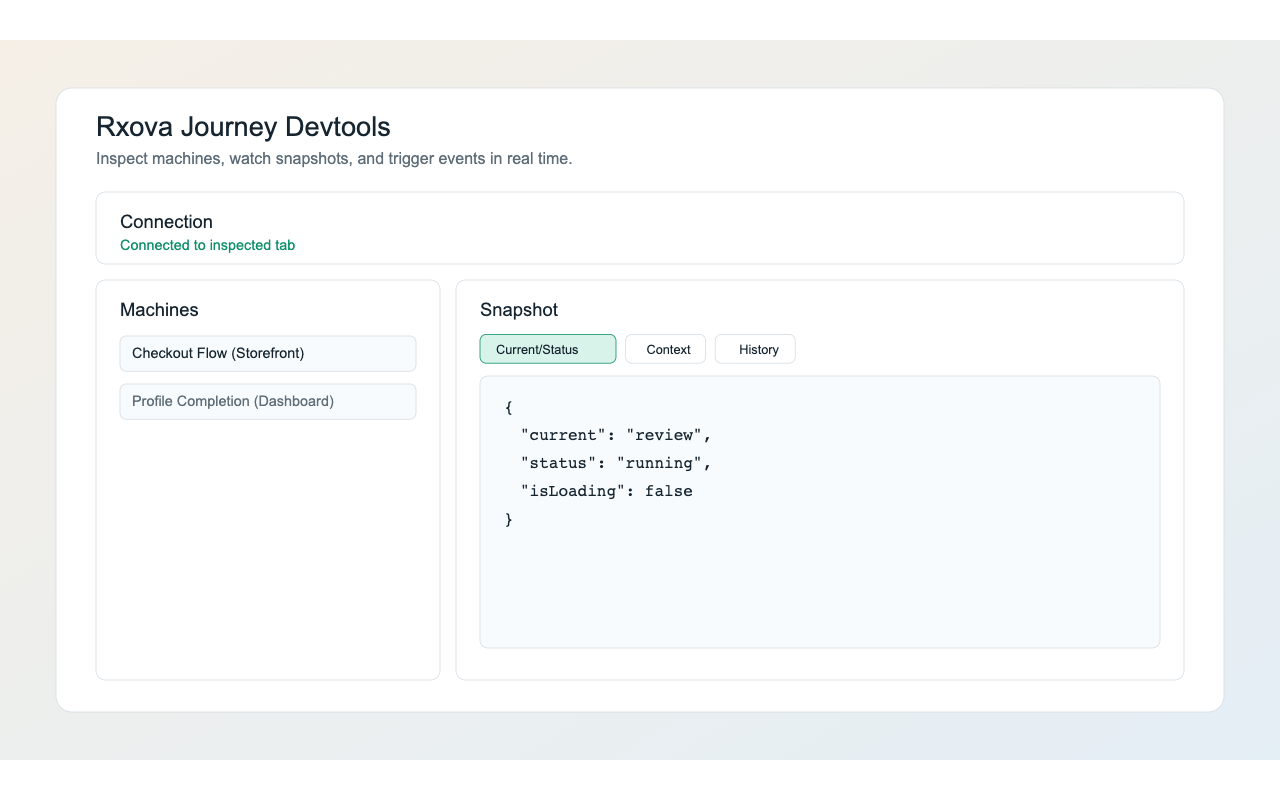
First Successful Session Screenshot
Default Runtime Behavior
If you do nothing else:
- Bridge is enabled in development when
import.meta.envorprocess.env.NODE_ENVexposes a non-production runtime. - Bridge is disabled in production.
- No-op in non-browser environments.
- If neither env source is available, bridge defaults to disabled.
To force production enablement:
attachJourneyDevtools(journeyMachine, { enabled: true });
Common Setup Pitfalls
- Bridge is attached before machine exists: attach after machine creation.
- Multiple machines with same
machineId: use unique ids. - Extension not yet available publicly: wait for Chrome Web Store approval and use bridge-only validation meanwhile.